Just wanted to do a real quick check in to tell you about some lovely lovely people who are giving away lovely lovely things!
1. Laine's is giving away our limited edition tote bag (the 'cartoon' one) to the first 200 VIP customers on 2 nov (starting 1:30pm) and best of all its going to be filled with Christmas surprises! Check it out
2. Purple Onion is giving away more free stamps from the new releases and also offering terrific specials on them. And there's even an overstock sale going on too. Check it out
Happy weekend!

Saturday, October 31, 2009
Thursday, October 29, 2009
A Little Perspective
Went to laine's the other day and cleared out some of my old projects to take home....a 'moving house' of sorts....makes one a bit sentimental. (warning.....long wordy post ahead....with only 1 photo)
I remember when I fell in love with scrapbooking....reading a scrapbooking magazine by Rebecca Sower that Elaine gave me....looking at the beautiful things she made, feeling inspired, and most of all moved at the life and heartfelt feelings she managed to capture through her pages. I'm trying to remember a little of that feeling today... it sometimes goes missing amidst the 'work'.
Over the years I have learnt to "design for work" and sometimes its hard to put your heart into it....but today I think I want to remember the best parts of my job - not just the deadlines, the time constraints, the customer preferences....
this was a bookbinding project from quite a while ago that I did where I got to have the best of both worlds - I got to design it the way I wanted, made everything from scratch, didn't care that it would probably wouldn't be possible to finish half of it in class, used all the materials that I liked and yet have peope willing to sign up for class (although there were some 'complaints' about the hard work - the binding and all the buttons on the spine were hand stitched)... But classes like these are few and far between. Most of the time, there are materials that need to be incorporated, constraints to consider (although I must state here that my sis is absolutely the best with giving me as much creative freedom as possible) - and there are days I feel tired or I design things in 'default mode' - i.e. with no heart...
But...as the title on my journal says, I guess it all boils down to "the Way I Look At Things" -
1. I can choose to see a difficult customer not as an irritant, but as someone who is part of the reason why I get to scrapbook for a living - and be grateful that they are interested in the store and my work
2. I can choose to see deadlines not as something breathing down my neck, but as signposts that help me prioritise the things I need to do - and be grateful because woolly-headed me would get nothing done otherwise
3. I can choose to see restrictions on class materials and timing not as cramping my style, but as challenges that have helped me be more creative with what I make - and be grateful for the myriads of happy accidents that have happened to me as a result.
So today....I choose to be grateful - I certainly have so much to be grateful for.
I remember when I fell in love with scrapbooking....reading a scrapbooking magazine by Rebecca Sower that Elaine gave me....looking at the beautiful things she made, feeling inspired, and most of all moved at the life and heartfelt feelings she managed to capture through her pages. I'm trying to remember a little of that feeling today... it sometimes goes missing amidst the 'work'.
Over the years I have learnt to "design for work" and sometimes its hard to put your heart into it....but today I think I want to remember the best parts of my job - not just the deadlines, the time constraints, the customer preferences....
this was a bookbinding project from quite a while ago that I did where I got to have the best of both worlds - I got to design it the way I wanted, made everything from scratch, didn't care that it would probably wouldn't be possible to finish half of it in class, used all the materials that I liked and yet have peope willing to sign up for class (although there were some 'complaints' about the hard work - the binding and all the buttons on the spine were hand stitched)...
But classes like these are few and far between. Most of the time, there are materials that need to be incorporated, constraints to consider (although I must state here that my sis is absolutely the best with giving me as much creative freedom as possible) - and there are days I feel tired or I design things in 'default mode' - i.e. with no heart...But...as the title on my journal says, I guess it all boils down to "the Way I Look At Things" -
1. I can choose to see a difficult customer not as an irritant, but as someone who is part of the reason why I get to scrapbook for a living - and be grateful that they are interested in the store and my work
2. I can choose to see deadlines not as something breathing down my neck, but as signposts that help me prioritise the things I need to do - and be grateful because woolly-headed me would get nothing done otherwise
3. I can choose to see restrictions on class materials and timing not as cramping my style, but as challenges that have helped me be more creative with what I make - and be grateful for the myriads of happy accidents that have happened to me as a result.
So today....I choose to be grateful - I certainly have so much to be grateful for.
Wednesday, October 28, 2009
Where the Cookies Went
Some time back I 'baked' some modelling paste cookies (recipe here).
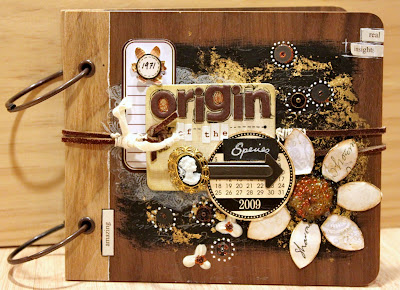
They ended up as little white flowers on this album. (all the other cookies were given out during the class)
 Happy Accidents and Experiments:
 Yes, that's me. And yes, I looked like a boy when I was little....
They ended up as little white flowers on this album. (all the other cookies were given out during the class)
"Origin of the Species" - Chatterbox wooden cover album
Happy Accidents and Experiments:1. Gold Foil Texture - The gold stuff on the background is gold foil (Stewarts) - for the life of me, I have never been able to get this stuff working properly (you're supposed to be able to stamp an image and foil it but I just can't seem to get it right - I blame the Singapore weather!). So, anyways, I got fed up with trying to make it neat and did this: - I stamped using a cookie cutter and elmer's glue....and then smacked the gold foil on. Brushed away the excess bits, dried the glue with my heat gun and voila....not bad. The lumpy texture is a result of my vigorous brushing but it turned out pretty ok.
2. Glitter Glue - I used Stickles (which is a glitter glue) as a glue - (duh! Sharon!) Squirted a blob of glitter glue, pressed in a button, let the glitter squirt out the side and leave to dry. (Don't laugh ok - it was a real 'lightbulb moment' for me) - then I purposely drew white dots around them so you would notice how pleased I was with myself...haha!
3. Super Bumpy Flower Centre - Made a big blob of liquid glue, then sprinkled beads in. Heated it, watched it sputter and bubble, burst the bubbles along the way, then coloured with Staz On ink - love to touch this bit (after its cool of course) - its super hard and bumpy!
And after all that mess....tired already so did this inside....
Yes, that's me. And yes, I looked like a boy when I was little....Sunday, October 25, 2009
If I had to Choose Only 2 Cardstock Colours...
Black and white - absolutely. No contest - black and white go with everything!
Here's black and white with blue....her favourite. (Hmmm....just realised the background doesn't actually look very white in this photo.....)
Layout Title: "Happy Happy Birthday Dear Beth"
 Sharon is Feeling Very Singaporean :
Its probably not very clear (cos its in the background) but I 'enlarged' a 6X6" square of GCD parisian labels pattern paper into an 9X9" square. Here's how:
1. Cut all the labels apart from the patterned paper (this would work with any other pattern that has many 'pictures' on it)
2. Spread them out on your larger piece of cardstock (or in my case chipboard).
3. Whitewash the whole piece, carefully painting around the images.
4. See, you save money and it looks artsy at the same time! How Singaporean is that!
I wish the weather wasn't so Singaporean today....sigh.
Subscribe to:
Posts (Atom)